While completing my 12 Days of E-learning Sharing series where I shared twelve reusable interactions and templates, I frequently came up with an idea and then thought of multiple ways to build it in Storyline. One of the challenges in e-learning design is not building the same thing over and over in different (or even the same) courses.
So I thought I would start an occasional series of posts where I take an idea and show three different methods to build it in Storyline.
Idea
Break a slide into diagonal wedges and have each wedge contain additional content emanating from the bottom center of the slide.
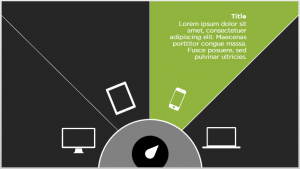 Build #1 – Dial
I’ll start with the example I used in the 12 Days post. In this example, I built a dial interaction to reveal more content. Each wedge has a selected state that reveals more content when the dial turns to a certain position. The wedges are grouped into a button set so that only one wedge can be in the Selected state at a time.
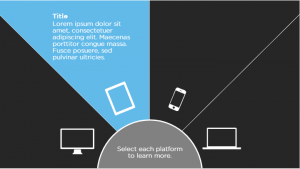 Build #2 – Click and Reveal
The obvious and easiest choice is to make this interaction a click and reveal item. Each wedge has a selected state that reveals more content when the learner clicks on a particular wedge. The wedges are grouped into a button set so that only one wedge can be in the Selected state at a time.
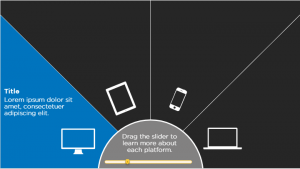 Build #3 – Slider
The slider is similar to the dial interaction, except the learner is sliding for the different wedge states vs. turning a dial.
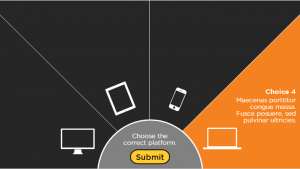 Bonus: Build #4 – Pick One
I duplicated the Click and Reveal slide and used the Convert to Freeform > Pick One interaction. Each wedge is a choice with only one wedge being the correct answer. The part that took the longest (which really wasn’t very long) on this one was customizing the feedback layers.
The main difference on these four slides is the bottom center area. The dial interaction obviously contains the dial. The click and reveal contains instructional text. The slider contains the slider and instructional text. And the pick one contains instructions and a custom submit button.
In future posts I’ll show additional examples of this 3 from 1 concept. My goal is to help people see beyond the “one, right way” to build things, or to always take the easy, repetitive route of developing in Storyline. I’d love to hear your thoughts on additional ways to develop the slide in this post or any other creative insights.
Leave a Reply